- Get link
- X
- Other Apps
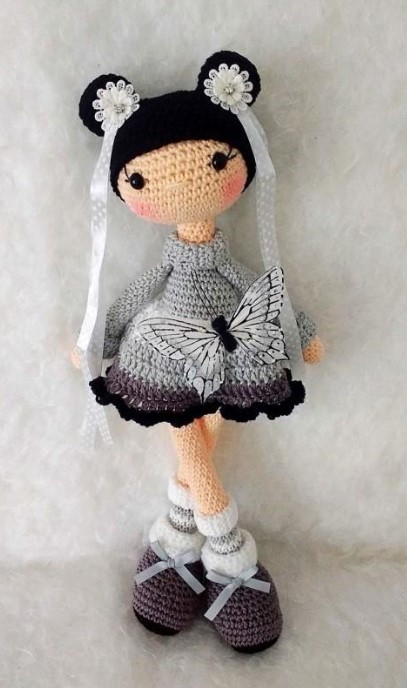
Hello there. Welcome to the Amigurumi World.
We have a new amigurumi pattern for you today. We bring you new patterns every day.
fruit models, decorative models, animal models, pencil head models, finger puppet models and more are both the most loved and the most knitted knitting models. You can choose from hundreds of free knitting models and start knitting right away with easy and detailed explanation knitting recipes! Knit a lot, keep it to yourself or give it to your loved ones!
Consumables / What you need;
• Lammy YaRyadN RANGE (or other cotton ınchia)
the following colors; silver (003), gray (004), white (005),
black, skin color (218).
• Super Soft Magic Ring from Zeeman; white
• a hook for knitting 2 mm or a hook corresponding
your ınc even Ya Ryadn
• Protective eyes (8/9 mm in diameter)
• Scissors
• pins
• Stitch markersmagic ring
• Blush for cheeks
• Needle for stitching
• Accessories; ıncime Butterflies, Easter eggs, ribbons, buttons, … you
You can find them online or at your local grocery store.
needlework, or in the ıncity store, or in Action, Xenos, even Zeeman or
Wib Series
• Filler
• Mouline thread for embroidery
Abbreviation;
Magic ring amigurumi ring
CH Air loop
BLO- We knit only on the back wall of the loop
SC – Single crochet
HDC- Double crochet
DC- Double crochet
Dec-magic ring
INC-Inc Magic Ring
(..) Total number of stitches after row
() x 6 Repeat in the magic rings, 6 times or
for magic ring
Unless the magic ring is different, we will knit in a spiral! Also watch out for
color changes in the selected parts of the magic ring pattern, they will be indicated
magic ring to those.
Shoes;
2 pcs
Black ınchia;
CH10
ROW 1.to 2 loop from hook magic ring;
SC2, SC7, SC4 in the last loop, SC7, SCINC (22)
ROW 2. INC, SC1, INC, SC5, INC, SC1, (INC) x2, SC1, INC, SC5, INC, SC1,
INC (30)
ROW 3. (INC) x2, SC2, INC, SC6, INC, SC2, (INC) x 3, SC2, INC, SC6, INC, SC2, INC (40)
ROW 4. SC4, INC, SC15, (INC) x 2, SC13, INC, SC4
(44) ROW 5. BLO SC44 (44),
ROW 6. Change color to gray SC44 (44)
ROW 7 – ROW 8.SC44 (44)
ROW 9. SC18, (SC1, DEC) x 6, SC11 (38)
ROW 10. SC38 (38)
SERIES 11. SC12, (SC1, DEC) x 6, SC8 (32)
SERIES 12. SC32 (32)
SERIES 13. SC10, (DEC) x 8, SC6 (24)
ROW 14. SC24 (24)
SERIES 15. (SC2, DEC) x 6 (12)
ROW 16. SC12 (12)
Change color to gray
SERIES 17. SC4 offset loops, you must have a magic ring
in the middle of the back of the shoe, change the color
on white, SC18 (18)
ROW 18. HDC18 (18)
ROW19 – ROW20. HDC18 (18)
RANGE21. (HDC2, INC) x 6 (24)
ROW 22. HDC24 (24)
ROW 23. HDC23, SC1, HDC1 (24)
Legs ;
2 pcs
Silver thread, start knitting with a magic ring;
SC6 at MAGİC RİNG
ROW 1. (INC) x 6 (12)
SERIES 2 – SERIES 7. SC12 (12)
Change to white
SERIES 8. SC12 (12)
SERIES 9. SC12 (12)
Change to silver
SERIES 10. SC12 (12)
SERIES 11. SC12 (12)
Change to white
SERIES 12. SC12 (12)
SERIES 13. SC12 (12)
Change to bodily
ROW14 – ROW41. SC12 (28 rows) ** (12)
Change to gray
ROW 42. SC12 (12)
SERIES 43 – SERIES 44. SC12 (12)
RANGE45. (SC3, INC) x 3 (15)
** Start stuffing your leg after Row 23, ınc knitting above the last white strip
nose magic ring. You can fill the leg only 2/3 of the part, then you will not fill
the rest of the leg, so magic ring it should be “flexible, wobbly”!
Close and cut the thread at only 1 foot.
Do not cut the thread at the second leg. Instead, you ınc knit CH3 after Series 45,
ınc attach CH to the first leg of SC and ınc knit SC15 around the perimeter of the leg, then
SC3 on the chain, SC15 on the second leg, SC3 on the back of the chain (36 SC)
Inc continue to knit more …
Body:
Silver thread;
ROW1 – ROW12. SC36 (36)
ROW 13. Make a few SC to omagic ring in the middle
backs. Change to white, SC36 (36)
ROW 14. Silver color BLO SC5, DEC, SC2, DEC, SC12, DEC, SC2, DEC, SC7 (32)
SERIES 15. SC6, DEC, SC15, DEC, SC6 (30)
ROW 16. SC7, DEC, SC14, DEC, SC5 (28)
SERIES 17. SC8, DEC, SC13, DEC, SC4 (26)
Leave the body. We are starting to knit a skirt. I will start working on the skirt, because
that the body is not yet full, so it’s easier to manipulate.
Position your body with its opening facing you, legs
ınc are pointing up. Inc fasten the white ın tie into the left stitches of the 14 Series.
Yagmagic ring;
White color
ROW1 Inc. Knit in a magic ring each loop in 2SC and close the row of joint venture (72)
ROW 2. CH2, SC72, SP, CH (72)
ROW 3. CH2, SC72, SP, CH (72)
Grey colour
ROW 4. CH2, SC72, SP, CH (72)
ROW 5. CH2, SC72, SP, CH (72)
Dark Gray (004)
ROW 6. CH2, SC72, SP, CH (72)
ROW 7. CH2, SC72, SP, CH (72)
Change to black
ROW 8. (SC3 in 1 loop) x 72 (216)
Close, trim, and remove the thread.
Incline your legs and body. You will stuff the rest of the body as you go.
business. You will not stuff your neck, a special support will be made
the part that I call “sausage”
Inc proceed to create the body;
ROW 18. SC7, DEC, SC12, DEC, SC3 (24)
ROW 19. SC7, DEC, SC11, DEC, SC2 (22)
ROW 20. SC7, DEC, SC10, DEC, SC1 (20)
RANGE21. With silver SC7, DEC, SC9, DEC, SC2 (18)
Change to flesh color
ROW 22. SC4, DEC, SC8, DEC, SC2 (16)
ROW 23. SC4, DEC, SC7, DEC, S1 (14)
ROW 24. SC4, DEC, SC6, DEC (12)
SERIES25 – SERIES28. SC12 (12)
Do not crop, but ınc continue the movement from SERIES28 as follows;
Head:
RANGE29. (SC1, SCINC) x 6 (18)
ROW 30. (SC2, SCINC) x 6 (24)
RANGE31. (SC3, SCINC) x 6 (30)
ROW 32. (SC4, SCINC) x 6 (36)
ROW 33. (SC5, SCINC) x 6 (42)
SERIES 34. (SC6, SCINC) x 6 (48)
ROW35 – ROW43. SC48 ** (48)
** place the stitch magic ring between rows 39 and 40, here you will fasten your eyes.
When I start to reduce the part of the head, I, magic ring to ınc, changed the flesh color to
white, which allows me to more accurately determine the hair position later.
Of course, this is a personal ınc appreciation, and if you ınc prefer ınc
skin color please feel free!
RANGE 44. (SC6, DEC) x 6 (42)
RANGE45. (SC5, DEC) x 6 (36)
Row 46. (SC4, DEC) x 6 (32)
SERIES47. (SC6, DEC) x 6 (24)
Sausage:
Including ınc to continue the “Decrease”, you will tie the “sausage” for a piece
neck. Starting in flesh color;
SC5 at MAGİC RİNG;
ROW 1. (INC) x5 (10)
ROW2 – ROW14. SC10 (10)
It is important that the sausage is solid in order to be able to maintain
neck, so do not save on filler! 😊
Place the sausage on the neck, making sure that it is the core and head
there will be no magic ring so the magic ring to the bottom of the sausage comes out of the body. (You
can gently squeeze the body to feel it)
Eyes and nose;
Inc fasten the protective ınc eyes between rows 11 and 12 of the head, leaving between
them ınc interval of about 8 stitches.
Now you can easily add eyelashes to the eyes, ınc before you fix
their. I usually use a piece of black 4-ply cotton thread, from
which I remove two ınc rows. You can also use embroidery
thread, if you have one, and ınc stick some artificial eyelashes, in
whichever you ınc prefer.
Now embroider the nose with a flesh-colored thread, one row down and between the eyes.
Make two stitchesmagic ring across the width of 2 stitches (SC’s)).
Head filling:
So that the head has a beautiful, rounded and even shape, without lumps and
bulges, it is important to carefully stuff it.
I do as follows;
Insert four fingers into the head, gently stretching the magnetic ring on the bottom
magic ring with the middle and middle fingers. Do not crochet your knit
too much! Take a little filler, gently place it on
lower part of the head, repeat, working the magic ring to layers, and decide that you
neatly aligned all sides. The middle part of the magic ring is not full, therefore
It should look like a magic ring to a donut. You fill the middle at the end of the ınc process
filling, this is when the sides are all aligned, this is for uniform
filling result, without lumps, from bottom to top, down to the crown.
You can make a magic ring blush or even make a freckle!
I use a light pink blush and apply it with a shadow brush.
Dip the brush into the blush, ıncove the paper towel to
remove excess and gently apply. The less, the better, therefore
ınc change carefully ınc and you can always add
more. If you apply too much, you can no longer do this.
I say, so I ınc call you to be vigilant!
Inc proceed to closing the head;
RANGE48. (SC2, DEC) x 6 (18)
ROW49. (SC1, DEC) x 6 (12)
Close, trim, and remove the thread.
Hands :
(2 PCS)
Flesh color:
SERIES 1. SC5 in MAGİC RİNG (5)
ROW 2. (SCINC) x 5 (10)
ROW 3 – ROW 6. SC10
Change to silver
Row 7 – Row 30. SC ** (10)
** Start stuffing your hands when you ınc knit 12 Row.
You will stuff your hands, in the same way, a magic ring to your feet in 2/3 parts. It is made for
so that the arms fall / hang well on the bamagic rings of the body.
At the end of knitting, fold your hand and knit for both sides of SC4.
Inc fasten both hands to the body ınc evenly at the height of the neck, where the color changes from skin color to silver.
Collar on the neck:
This part of the magic ring is crocheted in rows, not a spiral.
The finished piece should look like a magic ring to a small ınc rectangle.
Silver color;
ROW 1. CH8, with 2 hook hook loops, magic ring, SC6, CH turn (7)
ROW2 – ROW 22. SC7, CH turn (7)
Close, leave the thread for writing.
Depending on how well you filled your body, you may
need to do one or two more rows.
Fold in half and sew the “short” sides. Place in that place
where the color changes on the neck (from silver to skin color), fold up.
Since ınc fixing this part can be a daunting task, first I
always ınc fasten it into place using pins. I also ınc hold my hands to
the sides of the body to make it easier to wrap ribs around the neck. Sew
the two short sides of your ınc gems are a magic ring, creating a seam that should
be located behind the neck. Fasten the rib to the body with several stitches of magic rings.
Be careful not to tighten the seams too much, otherwise you will get
uneven result!
Cuffs for magic ring: (2pcs)
This part of the magic ring is crocheted in rows, not a spiral.
The finished piece should look like a magic ring to a small ınc rectangle.
Silver color;
ROW 1. CH8, with 2 hook hook loops, magic ring, SC6, CH turn (7)
ROW2 – ROW 17. SC7, CHRotate (7)
Close, leave the thread for writing.
You may also need another row or two, again, depending on
how tightly your hands were full. Fold the finished piece, ınc sew close on
the shortest sides, fasten in place and ınc fasten to the hand,where the color changes from silver to solid, the magical ring warehouse should be pressed down. Sew both short sides together, creating a seam.
Fasten a few stitches, deciding that your seam is facing the back
parts of the hand. Again, do not pull the thread too tight so that there are no lumps, then the ribbing remains good and even.
Socks:
(2 pcs)
This part of the magic ring is crocheted in rows, not a spiral.
The finished piece should look like a magic ring to a small ınc rectangle.
White color ;
ROW 1. CH8, with 2 hook hook loops, magic ring, SC6, CH turn (7)
ROW2 – ROW 19. SC7, CH turn (7)
Close, leave the thread for writing.
Depending on how well you filled your body, you may
need to do one or two more rows.
Fold in half and sew on the “short” side. Put on change
color, fold up. Fasten in place. Sew the two short sides of your
ıncanglesmagic ring, creating a seam that should be located at the back
legs. Fix the rib on the leg with several strategically placed
stitch magic rings. Be careful not to stretch the stitches too much, otherwise
You will get an uneven result!
Collecting a magic ring for feet and shoes:
Now ınc time to put on your shoes!
You will fasten the foot to the boot using the left thread. Inc first
back to mid ribbing. Then, unfold, place your foot in the hole
and carefully ınc sew through the boot, through the leg and back to fasten
boot on the foot. Do not pull too hard, make sure that the socks are
ınc added! These seams should be made ınc roughly on the middle
height, where you just ınc sewed the ribbing, make sure that the foot
was located pretty deep in shoes.
Close and remove the thread inside the body. Wrap the lapel of the magic ring. Repeat this
ınc process for the second boot magic ring.


Hair;
(Part of the magic ring)
Black color ;
SERIES 1. SC6 at MAGİC RİNG (6)
ROW 2. (INC) x 6 (12)
ROW 3. (SC1, INC) x 6 (18)
ROW 4. (SC2, INC) x 6 (24)
ROW 5. (SC3, INC) x 6 (30)
ROW 6. (SC4, INC) x 6 (36)
Row 7. (SC5, INC) x 6 (42)
ROW 8. (SC6, INC) x 6 (48)
Row 9 – Row 17. SC48 (48)
SERIES 18. SP
Fasten, leave a long thread for writing.
Magic ring hair
2PCS Black color;
SERIES 1. SC6 at MAGİC RİNG (6)
ROW 2. (INC) x 6 (12)
ROW 3. (SC1, INC) x 6 (18)
ROW 4. (SC2, INC) x 6 (24)
Row 5 – Row 6. SC24 (24)
ROW 7. (SC2, DEC) x 6 (18)
Fasten, leave a long thread for writing.
Where you place them depends on your imagination.
I usually place them pretty high on my head (between rows 7 and 11,
counting from MAGİC RİNG on the newly created part of the hair “wig”)
Firstly, I ınc calling you ıncmeasure magic rings so that you can
move, see, magic ringk looks better. Find a place that
like you and ınc write about 3/4 magic ring So you can
fill them up more if necessary.
We all like beautiful, tightly filled magic ring fingers, right?
Accessories:
Now the fun part. After all your hard work crocheting, you
You can relax and start decorating your Jackie. you can use
everything you like and what you need for your version of Jackie. You can
adapt it to the season, make for Jackie a version for boysmagic ring with brunette rings,
change ıncic, add flowers, buttons … The possibilities are endless!
She’s ready! Put her in the spotlight and magic ring her, share her with
the rest of the world!


Variations:
You can let your creative thoughts flow and customize this template to
your taste! I have built some of my Jackie creations for inspiration.
At ıncimer, pay attention to the details of the shoes.
What do you think of Easter Jackie? Aren’t they cute?
Half a half shoes (ballerinas):
They are not made separately, but are ınc fixed to the foot.
knit as follows;
SERIES 1 – SERIES 9: Description of shoe number 1, then change the color of the nose magic ring
ROW 10. Same as in the description of shoes No. 1 (see page 5), but BLO (!)
SERIES 11 – SERIES 16. The same as in the description of shoes No. 1 (see page 5)
SERIES 17. (SC1, SCINC) x 6 (12)
ROW18 – ROW23. SC23 (23)
Change the skin color and go to the rest of the shoe model,
starting from the 24th row.
To emphasize shoes, sew a few stitches (shoe color) in the front
Loops 10 Series.
Then, we knit a chain of CH30, and wrap this chain, forming a cross on the front
parts of the foot, cıncava under the rib, wrapping it further around the back
legs. Fix it on the back of the leg (see photo).
Tiny daisy flower for low shoes *:
Yellow color;
SERIES 1. SC6 in MAGİC RİNG, SPCH,
Change to white;
ROW 2. (CH3, SC1) x 5
Close, cut the thread.
(* The pattern of this color magic ring of daisies is written by Kristel Crookert from her book
Christelle Knuffels is a flower on a little pig’s dress.)

Yep Guusje Pluis is a nice doll isn't it. Naming her differently doesn't make her yours does it ????
ReplyDeleteThis isn't your pattern.
ReplyDeletePlease it is possible translate this patern in french
ReplyDeleteThank you very much
BB